
끄적이는 개발노트
NestJS 연습 프로젝트(Movie) - 테스트 본문
이번 포스트에서는 테스트에 대해서 알아본다.
1. package.json 살펴보기
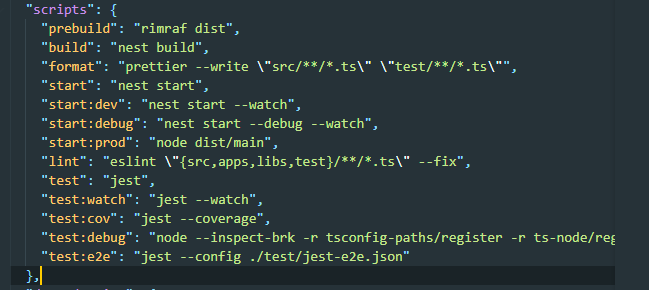
test에 해당하는 부분을 보면 jest를 사용하고 있다.
Jest
jest는 자바스크립트를 아주 쉽게 테스팅하는 npm패키지
.spec.ts 파일을 자동으로 찾아볼 수 있게 설정되어 있음
NestJS에서는 jest가 가능하게끔 기본적으로 제공해준다.
2. Unit Test
유닛 테스트는 시스템에서 함수, 클래스 같은 하나의 유닛만을 테스트하는 것이다.
우리가 유닛 테스트를 위해 사용할 명령어는 두개이다.
- test:watch -> .spec.ts 파일을 찾아 테스트를 실행함
- test:cov -> 모든 .spec.ts 파일을 찾아 몇 줄이 테스팅되었는지 알려줌
테스트코드
// movies.service.spec.ts

import { NotFoundException } from '@nestjs/common';
import { Test, TestingModule } from '@nestjs/testing';
import { MoviesService } from './movies.service';

describe('MoviesService', () => {
  let service: MoviesService;

  beforeEach(async () => {
    const module: TestingModule = await Test.createTestingModule({
      providers: [MoviesService],
    }).compile();

    service = module.get<MoviesService>(MoviesService);
  });

  it('should be defined', () => {
    expect(service).toBeDefined();
  });

  describe("getAll", () => {
    it("should return an array", () => {
      const result = service.getAll();
      expect(result).toBeInstanceOf(Array);
    });
  });

  describe("getOne", () => {
    it("should return a movie", () => {
      service.create({
        title: "Test Movie",
        genres: ['test'],
        year: 2000,
      });
      const movie = service.getOne(1);
      expect(movie).toBeDefined();
      expect(movie.id).toEqual(1);
    });
    it("should throw 404 error", () => {
      try {
        service.getOne(999);
      } catch(e) {
        expect(e).toBeInstanceOf(NotFoundException);
        expect(e.message).toEqual('Movie with ID: 999 not found.');
      }
    });
  });

  describe("deleteOne", () => {
    it("deletes a movie", () => {
      service.create({
        title: 'Test Movie',
        genres: ['test'],
        year: 2000,
      });
      const beforDelete = service.getAll().length;
      service.deleteOne(1)
      const afterDelete = service.getAll().length;
      expect(afterDelete).toBeLessThan(beforDelete);
    });
    it("should return a 404", () => {
      try {
        service.deleteOne(999);
      } catch (e) {
        expect(e).toBeInstanceOf(NotFoundException);
      }
    });
  });

  describe("create", () => {
    it("should create a movie", () => {
      const beforeCreate = service.getAll().length;
      service.create({
        title: 'Test Movie',
        genres: ['test'],
        year: 2000,
      });
      const afterCreate = service.getAll().length;
      expect(afterCreate).toBeGreaterThan(beforeCreate);
    });
  });

  describe("update", () => {
    it("should update a movie", () => {
      service.create({
        title: 'Test Movie',
        genres: ['test'],
        year: 2000,
      });
      service.update(1, {title: "Updated Test"});
      const movie = service.getOne(1);
      expect(movie.title).toEqual("Updated Test");
    });
    it("should throw a NotFoundException", () => {
      try {
        service.update(999, {});
      } catch (e) {
        expect(e).toBeInstanceOf(NotFoundException);
      }
    });
  });

});
describe -> 테스트를 묘사함
beforeEach -> 테스트를 하기 전에 실행됨
expect -> 조건
우선, getAll을 살펴보면 해당 값은 존재하든 존재하지 않든 배열로 반환이 되어야한다.
이를 확인해보려면, service의 각 함수에 접근을 해야하는데, 이것을 가능하게 해주는 것이 다음 코드이다.
service = module.get<MoviesService>(MoviesService);
getAll을 자세히 살펴보면,
  describe("getAll", () => {
    it("should return an array", () => {
      const result = service.getAll();
      expect(result).toBeInstanceOf(Array);
    });
  });
describe에 getAll을 테스트한다. (이름 달라도 되지만 헷갈리지 않게 통일)
it에 원하는 출력 문구를 정하고, 함수를 실행한다.
접근한 service에서 getAll함수를 실행하고 이를 result 변수에 담는다.
expect에 result를 조건으로 주고 배열에 해당하는지 확인한다.
하나 더 확인해보자.
getOne을 살펴보면,
describe("getOne", () => {
    it("should return a movie", () => {
      service.create({
        title: "Test Movie",
        genres: ['test'],
        year: 2000,
      });
      const movie = service.getOne(1);
      expect(movie).toBeDefined();
      expect(movie.id).toEqual(1);
    });
    it("should throw 404 error", () => {
      try {
        service.getOne(999);
      } catch(e) {
        expect(e).toBeInstanceOf(NotFoundException);
        expect(e.message).toEqual('Movie with ID: 999 not found.');
      }
    });
  });
데이터가 미리 존재해야 테스트가 가능하므로, create를 통해 가짜 데이터를 넣어준다.
service의 getOne함수에 id값이 1인 데이터를 찾아오고 이를 movie 변수에 담는다.
movie가 정의되었는지 확인하고, movie의 id가 1인지 비교한다.
만약, 존재하지 않는 데이터를 조회할 경우도 있기 때문에 이에 해당하는 테스트도 만들어준다.
try catch문을 활용하여 getOne함수에 id값이 999인 데이터를 찾아온다.
당연히 존재하지 않는 데이터이므로 catch문에 걸리게되고 에러를 뱉는데 이 때, 뱉는 에러가 NotFoundException이다.
따라서 확인을 하고, 출력메세지가 설정한 메세지와 동일한지 비교를 한다.
다른 테스트 역시 마찬가지로 이루어져있다.
실제로 테스트를 진행해보자.
$> npm run test:watch
$> a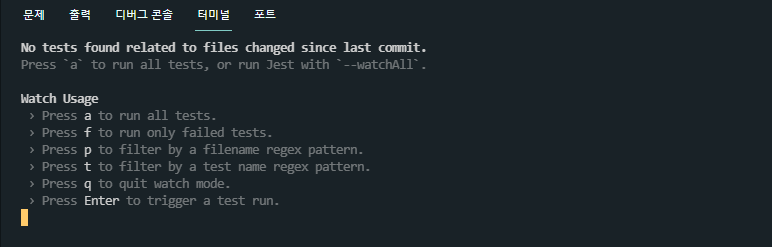
전체 테스트를 위해 a를 눌러준다.
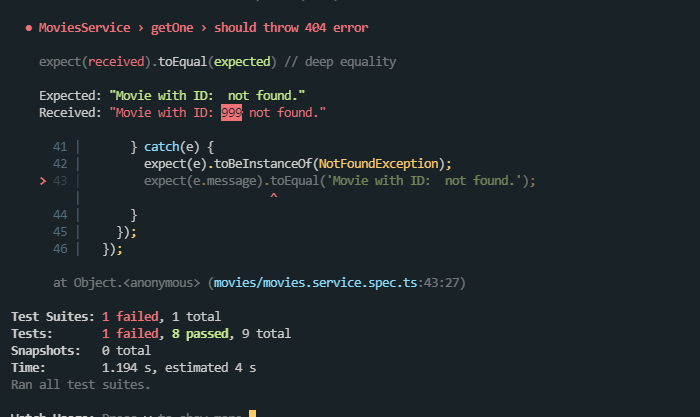
임의로 내용을 바꾸어 에러를 출력해보면 다음과 같이 출력된다.
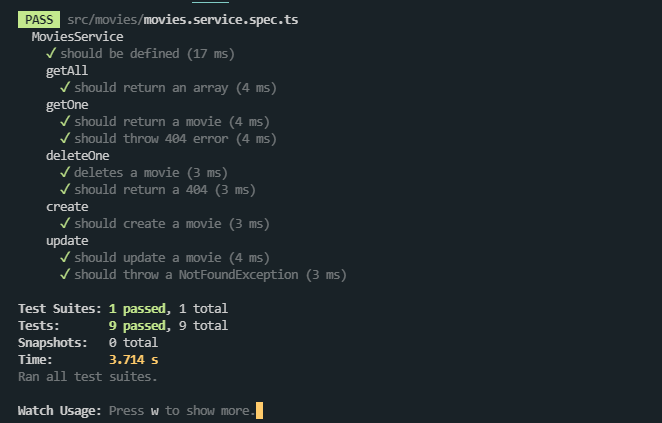
테스트가 정상이라면 다음과 같이 출력된다.
또 다른 테스트인 covarage를 실행해보자.
$> npm run test:cov모든 유닛에 대한 테스트를 실행하면 다음과 같이 100퍼센트로 나온다.
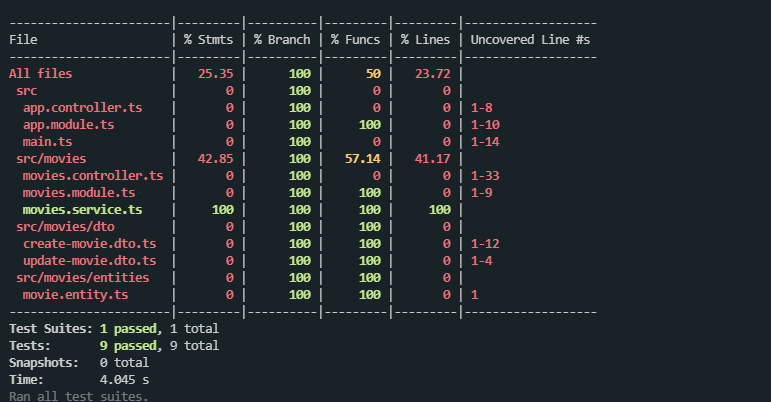
이렇게 되면 모든 유닛 테스트가 완료된 것이다.
3. E2E Test
e2e 테스트는 End to End라는 뜻으로 사용자가 취할만한 액션들을 전부 검사하는 테스트이다.
테스트코드
import { Test, TestingModule } from '@nestjs/testing';
import { INestApplication, ValidationPipe } from '@nestjs/common';
import * as request from 'supertest';
import { AppModule } from './../src/app.module';

describe('AppController (e2e)', () => {
  let app: INestApplication;

  beforeAll(async () => {
    const moduleFixture: TestingModule = await Test.createTestingModule({
      imports: [AppModule],
    }).compile();

    app = moduleFixture.createNestApplication();
    app.useGlobalPipes(new ValidationPipe({
      whitelist: true,
      forbidNonWhitelisted: true,
      transform: true,
    }));
    await app.init();
  });

  it('/ (GET)', () => {
    return request(app.getHttpServer())
      .get('/')
      .expect(200)
      .expect('Welcome to my Movie API');
  });

  describe('/movies', () => {
    it('GET', () => {
      return request(app.getHttpServer())
        .get('/movies')
        .expect(200)
        .expect([]);
    });
    it('POST', () => {
      return request(app.getHttpServer())
        .post('/movies')
        .send({
          title: 'Test',
          year: 2000,
          genres: ['test'],
        })
        .expect(201);
    });
    it('POST 400', () => {
      return request(app.getHttpServer())
        .post('/movies')
        .send({
          title: 'Test',
          year: 2000,
          genres: ['test'],
          other: 'thing'
        })
        .expect(400);
    });
    it('DELETE', () => {
      return request(app.getHttpServer())
        .delete('/movies')
        .expect(404)
    });
  });

  describe('/movies/:id', () => {
    it('GET 200', () => {
      return request(app.getHttpServer())
      .get('/movies/1')
      .expect(200)
    });
    it('GET 404', () => {
      return request(app.getHttpServer())
      .get('/movies/999')
      .expect(404)
    });
    it('PATCH 200', () => {
      return request(app.getHttpServer())
      .patch('/movies/1')
      .send({
        title: "Updated"
      })
      .expect(200)
    });
    it('DELETE 200', () => {
      return request(app.getHttpServer())
      .delete('/movies/1')
      .expect(200)
    });
  });

});
종합적인 함수와 요청들을 확인하기 위해 e2e 테스트를 사용한다.
다만, 각 요청(url)에 대한 test를 진행하기 때문에, controller, service, pipe들을 전부 테스트하는 것과 같다.
방법은 유닛 테스트와 비슷하지만, request를 보내고 response를 확인하는 방식으로 진행된다.
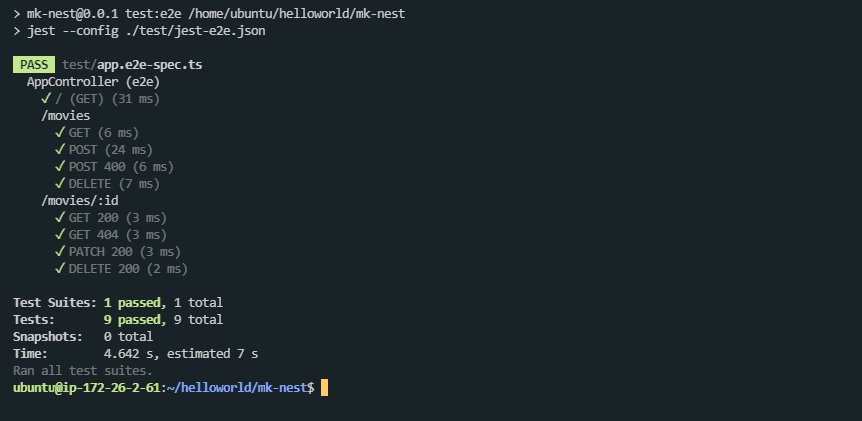
테스트 명령어는 다음과 같다.
$> npm run test:e2e정상적으로 테스트 코드를 작성하고 진행하였다면 다음과 같은 화면이 나온다.
테스트에 에러가 발생할 경우, 자세하게 알려주므로 그에 맞게끔 코드를 수정하면서 진행하면 된다.
유닛 테스트와 E2E 테스트는 서비스를 실제 운영하기 이전에 코드의 에러 사항에 대해 확인할 수 있는 유용한 방법이다.
테스트하는 방법을 마지막으로, NestJS의 기본 사용법을 활용한 연습 프로젝트를 완료했다.
'JavaScript > NestJS' 카테고리의 다른 글
| NestJS와 MongoDB 연결하기(2) - Module, Service, Controller (0) | 2021.10.08 |
|---|---|
| NestJS와 MongoDB 연결하기(1) - 설치 및 스키마 정의 (0) | 2021.10.08 |
| NestJS 연습 프로젝트(Movie) - DTO와 유효성검사 (0) | 2021.10.01 |
| NestJS 연습 프로젝트(Movie) - 전체코드(CRUD) (0) | 2021.10.01 |
| NestJS 연습 프로젝트(Movie) - Service 기본 사용법 (0) | 2021.10.01 |


