
관리 메뉴

끄적이는 개발노트
React Naitve - CSS 적용 방법 (with StyleSheet / NativeWind) 본문
728x90
React Native에서 CSS를 적용하는 방법은 간단하게 두가지가 있다.
이는 Expo와 동일하지만 NativeWind 설정에서 차이점이 있어 기록한다.
1. StyleSheet
// App.tsx

import {SafeAreaView, StyleSheet, Text, View} from 'react-native';

function App(): React.JSX.Element {
  return (
    <SafeAreaView style={styles.container}>
      <View style={styles.box}>
        <Text style={styles.text}>스타일시트 적용!</Text>
      </View>
    </SafeAreaView>
  );
}

const styles = StyleSheet.create({
  container: {
    flex: 1,
  },
  box: {
    width: '100%',
    height: '100%',
    display: 'flex',
    alignItems: 'center',
    justifyContent: 'center',
    backgroundColor: 'white',
  },
  text: {
    fontSize: 16,
    color: 'blue',
  },
});

export default App;
2. NativeWind
본인이 좀 더 선호하는 방식이다.
1. 설치
npm install nativewind tailwindcss react-native-reanimated react-native-safe-area-context
#or
yarn add nativewind tailwindcss react-native-reanimated react-native-safe-area-context
2. 설정
npx tailwindcss init
위 명령어를 실행하면 tailwind.config.js 파일이 생성된다.
생성된 파일을 아래와 같이 수정한다.
// tailwind.config.js

/** @type {import('tailwindcss').Config} */
module.exports = {
  // tailwindcss가 적용될 폴더 및 파일 설정
  content: [
    './App.{js,jsx,ts,tsx}',
    './navigation.{js,jsx,ts,tsx}',
    './src/**/*.{js,jsx,ts,tsx}',
  ],
  presets: [require('nativewind/preset')],
  // theme 설정 (extend를 통해 확장하거나 기존에 선언된 css class도 변경 가능)
  theme: {
    extend: {
      colors: {
        success: '#22bb33',
        error: '#FF2424',
        info: '#5bc0de',
      },
      transitionProperty: {
        colors:
          'color, background-color, border-color, text-decoration-color, fill, stroke',
      },
    },
  },
  plugins: [],
};
global.css 파일을 생성한다.
/** global.css **/

@tailwind base;
@tailwind components;
@tailwind utilities;
bable 설정을 바꿔줘야하는데 이 부분이 cli 와 expo의 차이점이 발생한다.
// bable.config.js

module.exports = {
  presets: ['module:@react-native/babel-preset', 'nativewind/babel'],
};
metro 설정도 바꿔준다.
// metro.config.js

const {getDefaultConfig, mergeConfig} = require('@react-native/metro-config');
const {withNativeWind} = require('nativewind/metro');

/**
 * Metro configuration
 * https://reactnative.dev/docs/metro
 *
 * @type {import('metro-config').MetroConfig}
 */
const config = mergeConfig(getDefaultConfig(__dirname), {
  /* your config */
});

module.exports = withNativeWind(config, {input: './global.css'});
typescript를 사용하는 경우, nativewind-env.d.ts 파일을 생성한다.
// nativewind-env.d.ts

/// <reference types="nativewind/types" />
마지막으로, 생성한 global.css 파일을 App.tsx에 추가한다.
// App.tsx

import {SafeAreaView, Text, View} from 'react-native';
import './global.css';

function App(): React.JSX.Element {
  return (
    <SafeAreaView className="flex-1">
      <View className="w-full h-full flex justify-center items-center bg-white">
        <Text className="text-success text-base">스타일시트 적용!</Text>
      </View>
    </SafeAreaView>
  );
}

export default App;
3. 실행
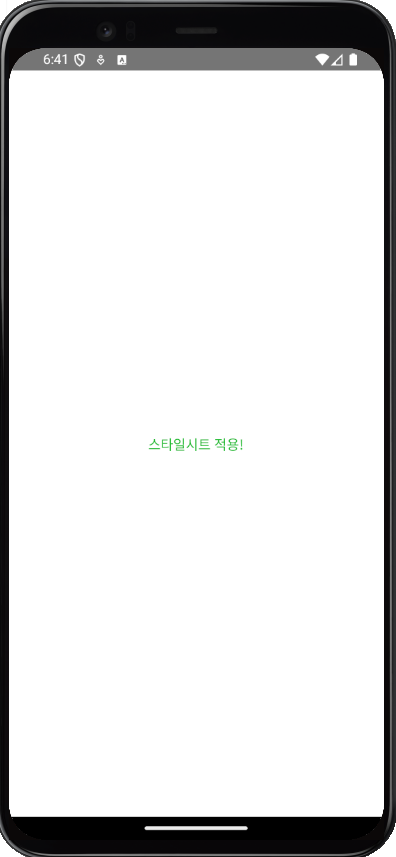
StyleSheet와 NativeWind 코드를 실행해보면 둘 다 방식은 다를 뿐 css 내용은 같기 때문에 아래와 같이 동일한 화면이 실행되는걸 확인할 수 있다.
728x90
'React Native' 카테고리의 다른 글
| React Native - 절대 경로 (0) | 2025.01.21 |
|---|---|
| React Native - Font 적용하기 (0) | 2025.01.21 |
| React Native - 환경설정 (2) / 프로젝트 생성 (0) | 2023.07.13 |
| React Native - 환경설정(1) / Android Studio 설치 (0) | 2023.07.13 |
| Expo - 스크린 포커스 시 이벤트 주기 (0) | 2023.06.22 |
'React Native' Related Articles
more


